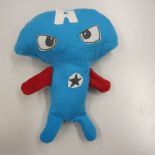
SOFT ANIMAL
Name: ___________________
CUTTING THE FABRICS
Fold the fabric
Place the pattern to the very edge of the fabric
Tag the pattern with pins
When you have all pieces ready,
ask the cutting permission from teacher!
YOU NEED:
2 x BODY
4 X EARS
4 X HANDS
4 X LEGS
2 X EYES
(2 X TAIL)
1 X NOSE
SEWING THE SOFT ANIMAL
Sew the HANDS, LEGS and EARS:
1. Tag two pieces together with pins, right sides are facing
From four hand piece you will have two hands etc…
2. SEW pieces with straight stitch like in the picture. The edge of pressfoot
is on the edge of the fabric.

3. Turn the pieces right side up
MAKE THE FACE TO YOUR SOFT ANIMAL:
4. Draw eyes, nose and mouth on the fabric. Note! Make the pieces so big
that you can sew around! (if you want you can make the mouth from the
tread, eyes from buttons, for example)
- Iron piece of the IRON-ON ADHESIVE to the back side of the fabric (Use baking paper as a cover!)
- Cut the figure carefully; follow the lines
- Remove the cover-paper of the iron-onadhesive
- Place the pieces on their right places
- Iron the pieces to their right places
- Sew a zigzag or a straight stitch around the pieces

5. Place the hands, legs and ears on to their right places, but so that they
are pointing inside (look the picture). Tag with pins.
Sew the pieces on to the body piece with straight sticth
Place the other body piece on top of the other, right sides are facing.
Legs, Hands, ears and face are now between the pieces.
Tag carefully with pins. Sew with straight stich so that the edge of the
pressfoot is on the edge if the fabrics. NOTE! Start sewing from the
armpit, sew the toy around, but stop sewing about 4 cm before you
reach the starting point (check the picture). There will be a hole.
REMEMBER to go backwards in the beginning and end.
Turn the toy right side up
10.Sew the hole by hand
11.Cut the treads!
12.READY!
