
The size in the pattern is European 37/38 (4/5), but it is easily adjustable. The amount of yarn is sufficient for bigger size as well.
CROCHETED MINNI SLIPPERS
Yarn: Novita Isoveli (or yarn matching to gauge) 100 g main color and some contrast color, additionally 2 buttons
Hook: nr 5 mm (US H)
Gauge: 14 sts/10 rows = 10 cm/4 in
The size in the pattern is European 37/38 (4/5), but it is easily adjustable. The amount of yarn is sufficient for bigger size as well.
Slippers are crocheted in half double crochet (US). The tip is crocheted in circles and rest of the slipper back and forth.
Make sure you have the right amount of stitches after every round so that your work stays in the right shape!
Abbreviations (US):
rnd = round
ch = chain (stitch)
hdc = half double crochet
sl st = slip stitch
sc = single crochet
Tip of slipper:
Beginning with a yarn loop: Make a loose loop round your pointer finger and take the yarn through the loop with the hook, chain two.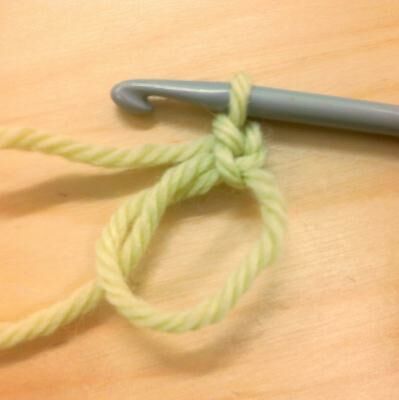
- rnd: Make 7 x hdc in the loop (those 2 chs you just made form the first hdc of rnd ) = 8 sts. Pull the end of the yarn to close the round and form a circle. End rnd with sl st to 2nd ch from beginning.

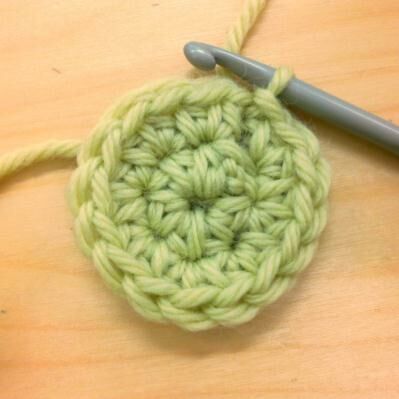
- rnd: Ch 2 . Make 2 x hdc in each st of the previous rnd = 16 sts. End rnd with sl st as you did on previous rnd.
- rnd: Ch 2 . Make 2 x hdc in every other st of prev. rnd = 24 sts. End with sl st.
- rnd: If the beginning of the slipper needs to be widened, add the needed amount of sts evenly during the rnd. Otherwise continue to make hdcs without adding any sts. Begin and end the rnds like you did on prev. rnds.
- – 8. rnds: Continue with hdcs. If you wish to make a shorter tip make only 7 rnds. The tip of the slipper is now finished and you continue crocheting the rounds back and forth.

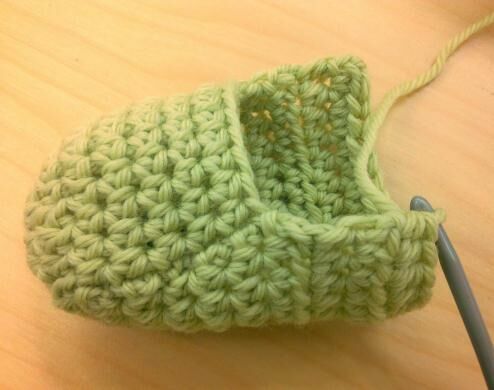
Back of slipper:
- rnd and onwards: Ch 2 and turn. Make 16 x hdc or more if your slipper is wider than in pattern (first 2 ch form the first hdc of rnd) = 17 sts (or more). Leave 7 sts intact for slipper upper side (8 sts for bigger sizes). Make sure the amount of sts stays the same all the time (min. 17 sts). Fit the slipper to your foot to check the length (e.g. 15 rnds). Stretch the slipper when you fit it because it will become looser in the use.
Fold the back of the slipper to form the heel and join the edges with sl sts through sts like in the picture. Cut the yarn but leave some for weaving it later in.
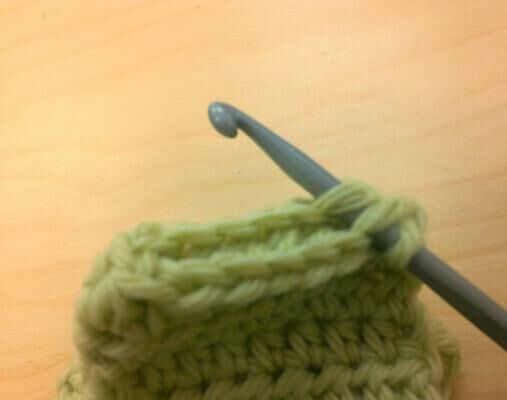
Finishing the brim of the Minni-slipper:
Fasten the yarn in the middle back (above the heel) by pulling it through with the hook. Ch 1 and start with single crochet along the brim. Make sure the brim will become comfortably snug (e.g. 3 scs/2 hdc rows) – the slipper in the picture has 21 scs along the side. When you come to the corner crochet 2 sts together, 5 scs in the middle (6 scs in bigger size), again 2tog and the same amount scs as on the other side.
End rnd with sl st and cut the yarn (if you wish to continue with contrast color, if you don’t: continue with the same yarn). Change the yarn color and fasten the yarn to the starting point of the next rnd. Make another rnd of scs making the decreases in corners – the pattern slipper has 20 scs, 2tog, 4 scs, 2tog, 20 scs. End rnd with sl st and cut the yarn.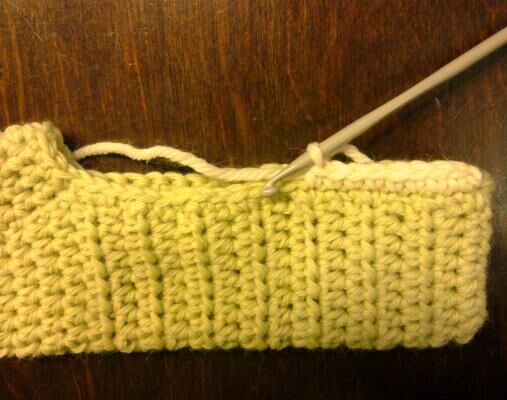
Strap:
Fasten the yarn to the suitable spot on the brim and ch so that it will fit your foot (14 ch in the pattern). Ch 5 – 7 for the button loop (depending on the size of the button) and ch back along the upper edge of the chain. End rnd with sl st to the brim and cut the yarn. Weave in all yarn ends and fasten the button on the other side of slipper.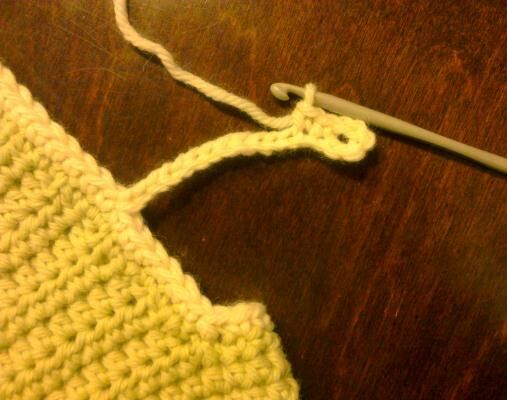
Crochet another slipper but make the strap and button on the opposite side.
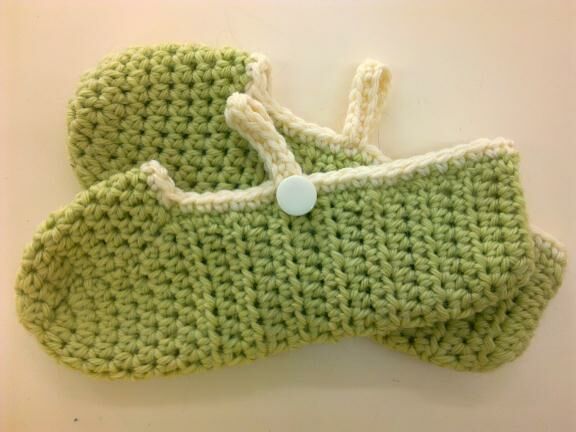
Your Crocheted Minni-slipers are now ready!
