Tässä ohjeessa opit miten tehdään kaunis rintakoru. Tämä ohje on englanniksi sekä suomeksi!

How to design and make a felt brooch
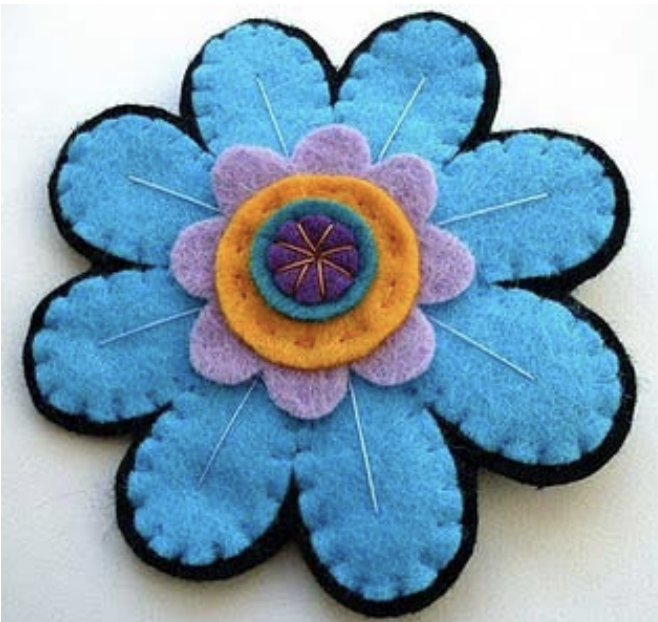
This is a slightly unusual "how to" as it's not just a tutorial for making the flower brooch shown in the pictures but more a beginner's guide to making things with felt, which will cover lots of things I get asked by my blog readers and customers who buy packs of felt squares from my shops.
If you're new to felt crafting, I hope you find it useful and it inspires you to get sewing!
P.S. Making stuff from your own patterns is great, but if you'd like to sew the flower featured in this tutorial fear not! Double click on this image to print out
the pattern pieces (print at 100% to make a flower the same size as mine).
I think this design is a great one for experimenting with colours and the use of different stitches. As with all my tutorials, please remember that this flower design is not intended for commercial use! You can make as many of these flowers for your friends as you want but please don't sell them or reproduce this tutorial.
Miten suunnitellaan ja tehdään rintakoru huopakankaasta?
Tämä ei ole vain kuvitettu huopakukkien teko-ohje, vaan enemminkin opas aloitteleville huopakangastöiden tekijöille. Ohje on syntynyt Felt Shopitani huopakankaita ostavien asiakkaiden kysymyksien pohjalta. Jos olet vasta-alkaja huopakäsitöiden parissa, toivon että tämä ohje innostaa sinua ompelemaan!
P.S. Omien suunnitelmien toteuttaminen on hienoa, mutta älä epäröi, jos haluat, voit käyttää tämän ohjeen mallia! Klikkaa kuvia ja tulosta kaavat. Mielestäni tämä suunnitelma on erinomainen harjoitus värin käytöstä ja erilaisten pistojen ompelusta. Huomaathan, että tämä ohje, kuten kaikki ohjeeni on vain ei-kaupalliseen käyttöön.
Voit tehdä mallin mukaan niin monta kukkaa kuin haluat itsellesi ja ystävillesi, mutta älä myy niitä tai tätä ohjetta.
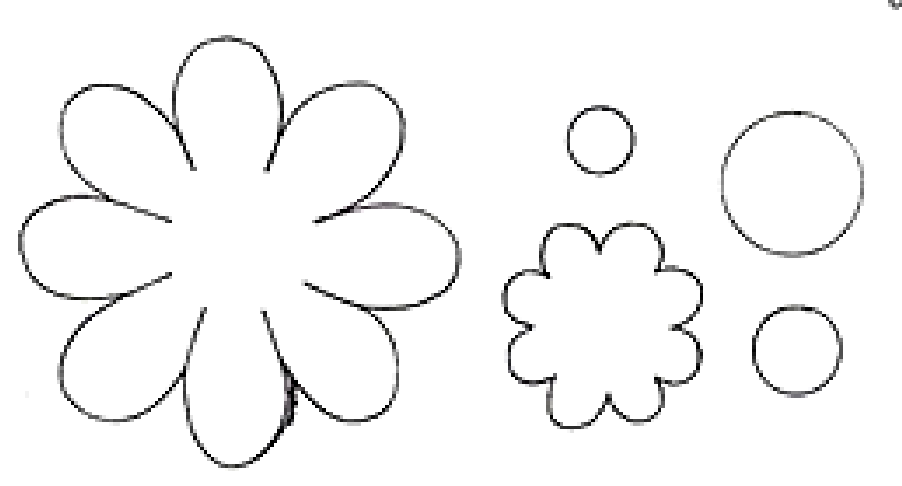
The patterns for the flower
Kuviot kukan tekemiseen
Copyright information
© Laura Howard
http://bugsandfishes.blogspot.com
http://bugsandfishes.blogspot.com/2010/03/how-to-design-and-make-feltbrooch.html
Suomennos Käspaikkaan www.kaspaikka.fi, tekijän luvalla Pirjo Sinervo
Finnish version for Käspaikka www.kaspaikka.fi by permission of Laura Howard
2010
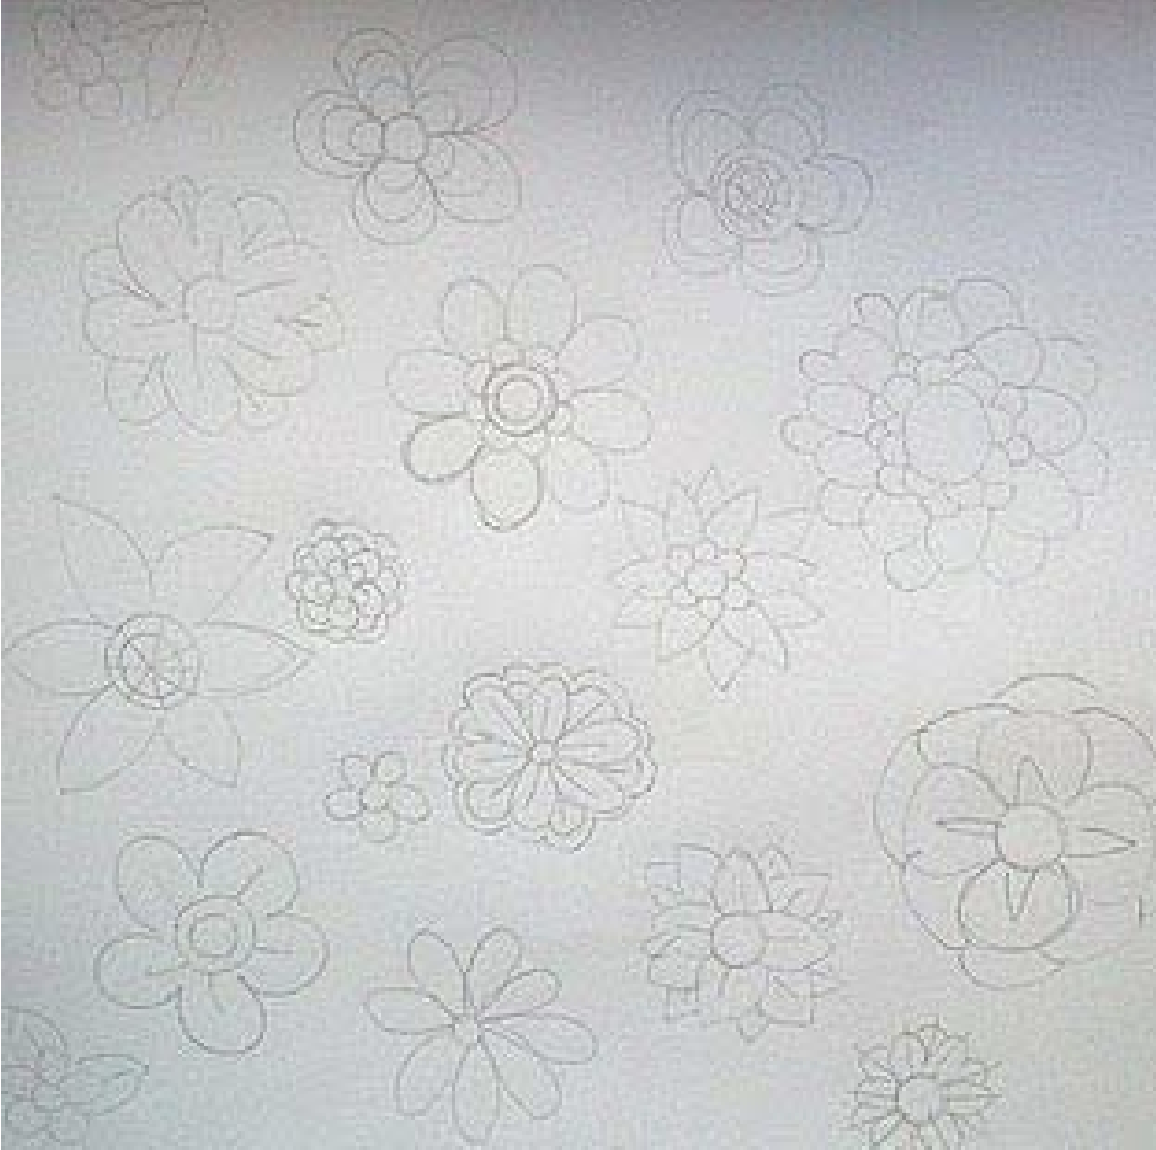
The first step
When designing a brooch or anything else is to get doodling. You don't have to be a great artist to design brooches that are your own
original creation (and copying other peoples designs is never cool).
I decided to make a flower brooch so I started out drawing lots of different flower shapes.
Ensimmäinen vaihe
Rintakorun suunnittelussa, niin kuin kaikessa
muussakin suunnittelussa, on luonnosteleminen.
Sinun ei tarvitse olla suuri taiteilija osataksesi suunnitella rintakoruja, jotka ovat täysin omia luomuksiasi (muilta kopiointi ei ole koskaan yhtä ”siistiä”).
Minä päätin tehdä kukkakorun ja niinpä piirtelin aluksi paljon erilaisia kukkia.
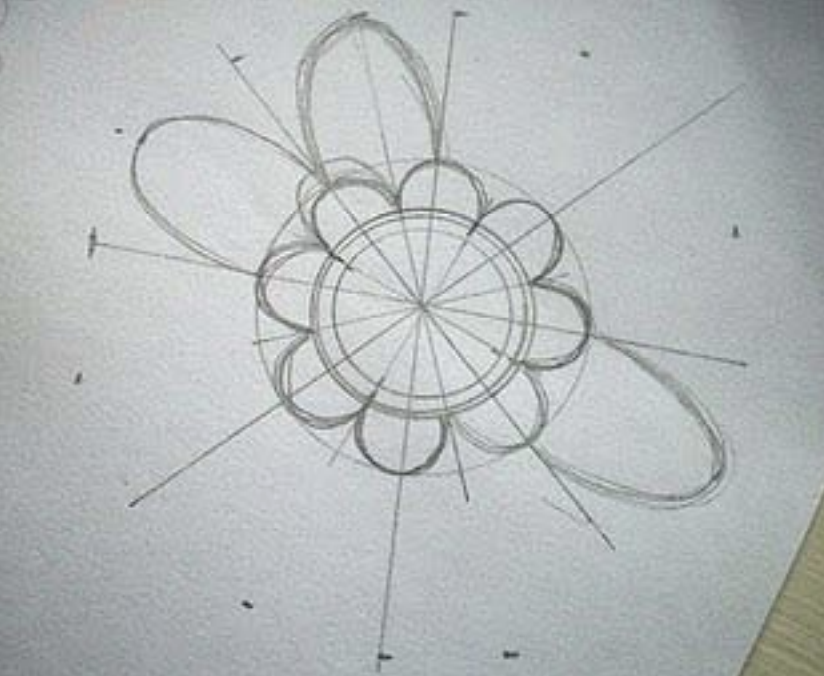
The next step
Once you get a rough design that you like, the next step is to turn that doodle into a pencil drawing of how you want your brooch to look.
I often draw and redraw things half a dozen times before I get them how I want them. For this design I wanted a symmetrical flower so I used rulers and circle templates to help me keep the petals the same lengths.
Seuraava vaihe
Kun mieluinen, vaikkakin vielä karkea luonnos syntyy, jatka sen viimeistelemistä (lyijykynällä) aina vain paremmin itseäsi miellyttävän
näköiseksi.
Itse piirrän uudelleen ja uudelleen, usein 6-7 kuvaa, ennen kuin löydän mieluisan version. Tähän suunnitelmaan halusin symmetrisen kukan, joten käytin apuna viivoitinta ja harppia (pyöreät esineet, mukit jne. käyvät myös)), jotta sain terälehdistä samanpituisia.
After the sketch is done
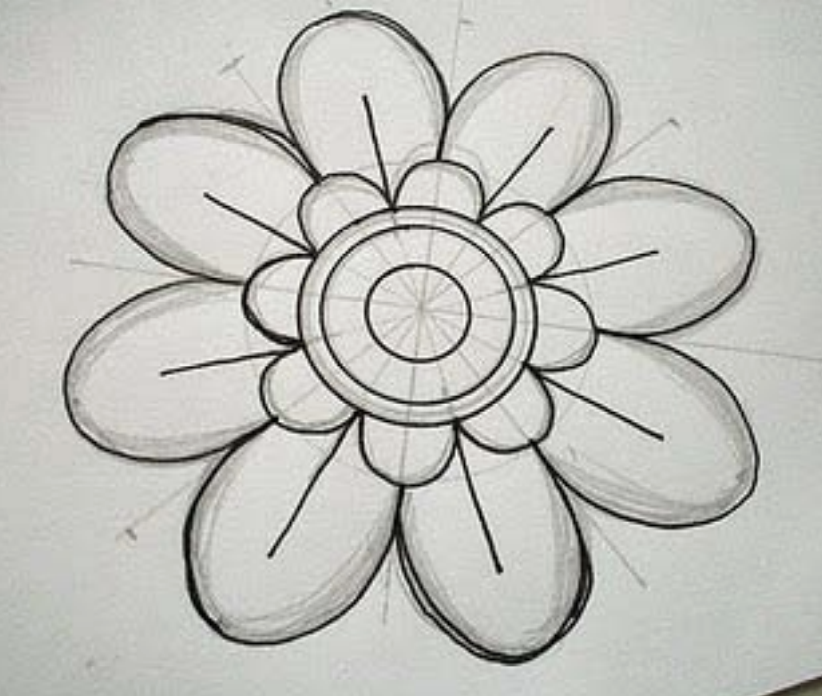
When you've got a sketch that you're happy with, use a black fine liner to draw in the final lines over your pencil scribblings.
I added an extra circle and some detailing on the outer petals at this point as I thought the flower needed a bit of extra detail. Never be afraid to tweak your design as you go along or to try out two different versions to test how they will look!
Kun piirros on valmis
Kun saat luonnoksesi valmiiksi, piirrä se vielä puhtaaksi ohutkärkisellä huopakynällä.
Minä lisäsin kukan keskelle vielä yhden ympyrän ja terälehtiin yksityiskohtia. Älä epäröi parannella suunnitelmaasi vielä työn edetessä ja kokeile myös erilaisia versioita testataksesi miltä ne näyttävät!
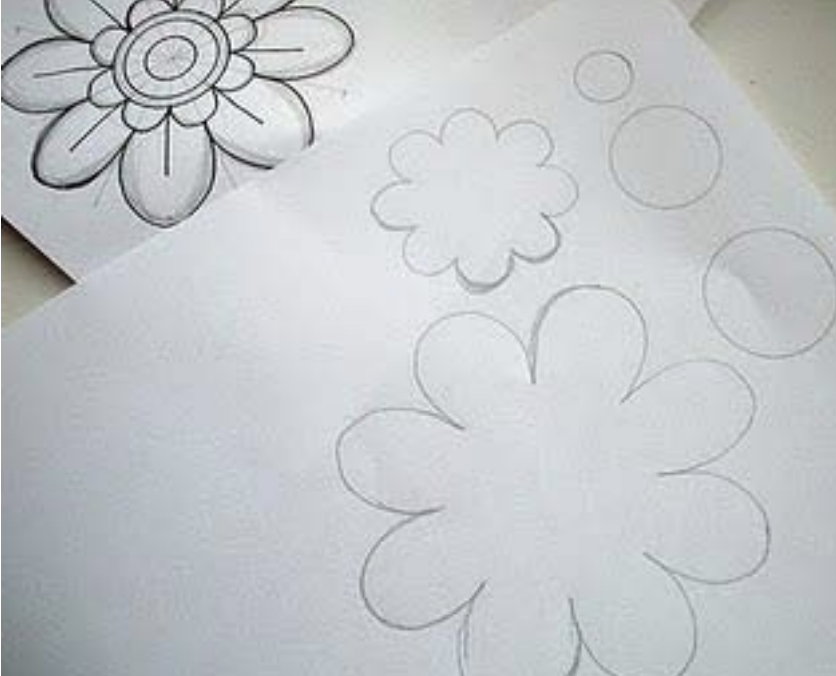
The black pen lines help finalise your design but they are also a great help
with the next step - tracing over your drawing to create your pattern pieces.
Take a piece of plain white paper, place it over your drawing and trace each shape involved in your design. When you've drawn all your pattern pieces, cut them out.
Huopakynäviivat selkeyttävät suunnitelmaasi ja ne ovat myös apuna seuraavassa vaiheessa kun kukan osista tehdään kaavat.
Piirrä läpikuultavalle paperille kaikista kukan osista erilliset kaavat ja
leikkaa ne lopuksi irti ääriviivoja pitkin.
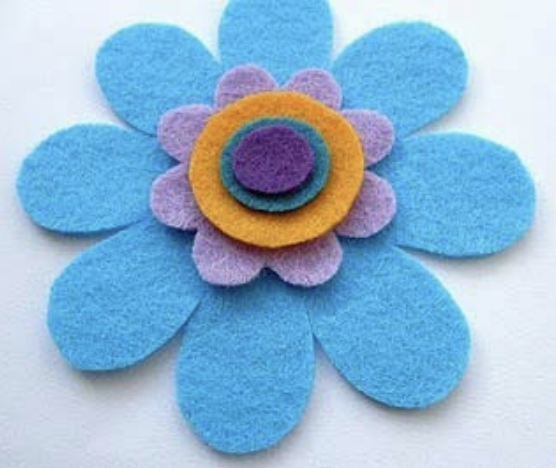
Choosing the colours
Now you have the fun part of choosing colours! You could do a drawing of
your design and colour it in to plan out colour combinations beforehand
but I think there's nothing quite like seeing the real live felt colours
together.
I wanted to use satsuma orange felt as an accent colour in my
flower, but when I cut the pieces out and laid them on top of each other as
I'd designed I realised I wanted more orange visible, so I changed the
design slightly.
Värien valinta
Sitten on vuorossa hauska vaihe: värien valinta! Voit toki käyttää värejä
jo suunnittelussa, mutta mikään ei vedä vertoja sille että näkee oikeat,
värikkäät huovat yhdessä.
Minä halusin oranssia tehosteväriksi kukkaani, mutta kun leikkasin palat
ja sovitin niitä yhteen suunnitelmani mukaan, tajusin, että haluankin
enemmän oranssia näkyviin ja niinpä muutin suunnitelmaa vielä vähän.
Cutting out small fiddly felt pieces can be tricky, so take your time! I
recommend buying a pair of embroidery scissors, the small blades make
it much easier to cut out small shapes.
Pienten ja pikkutarkkojen osien leikkaaminen voi olla hankalaa, joten
keskity rauhassa. Pienillä teräväkärkisillä saksilla on helpointa leikata
pieniä osia.
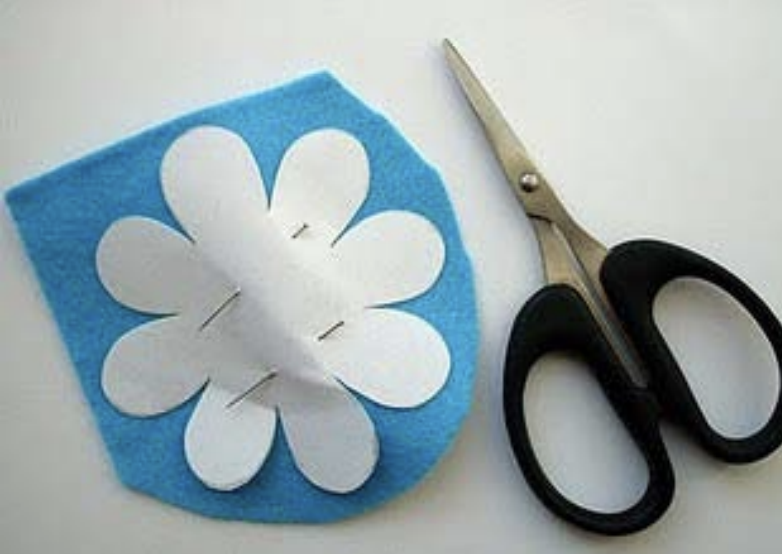
The pinning
Pin larger shapes in place, and hold very small pieces in place against the felt between your thumb and fingers while you cut around the pattern. I always roughly cut off any excess felt around the pattern piece to make it easier to cut round fiddly shapes.
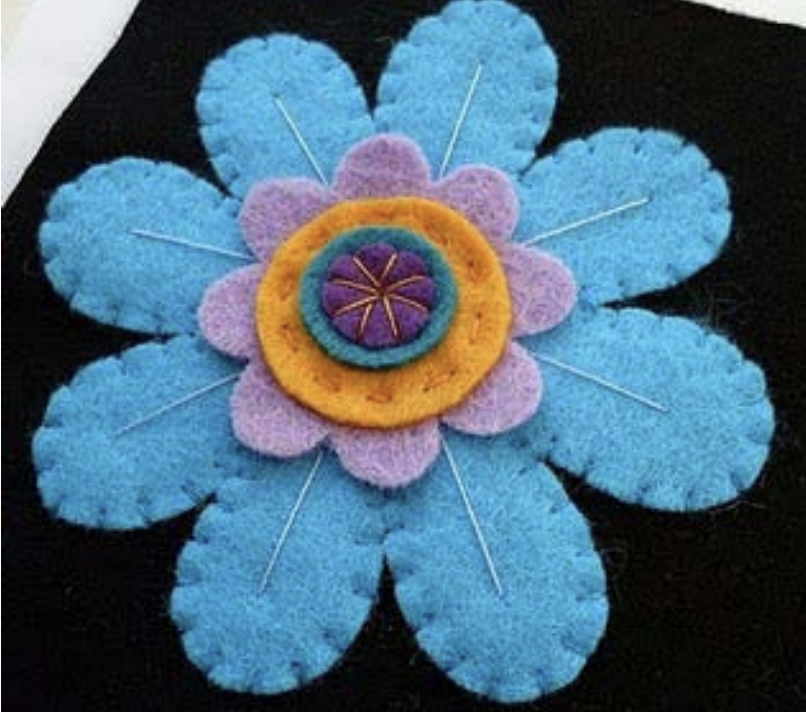
Now it's time to sew your pieces together. There are lots of guides to different stitches on the internet… but some things to think about are how the stitches will add to the pattern and texture of your design, and whether you want to use matching thread (thread the same colour as the felt you're stitching) or contrasting thread (to create extra decorative details).
Neulaaminen
Neulaa osat paikoilleen, ja pidä pienissä osissa kaavaa ja huopaa paikoillaan sormillasi. Itsestään häviävällä taikatussilla voit piirtääkin osat suoraan kankaalle. Itse leikkaan osat irti kankaasta ensin karkeasti ja vasta sitten viimeistelen tarkasti.
Ompeleminen. Pistojen ompeluohjeita löydät Käspaikasta www.kaspaikka.fi/kirjonta.
Mieti miten pistot vaikuttavat työsi ulkonäköön ja haluatko käyttää ompelussa saman vaiko eri väristä lankaa kuin huopakangas, jota olet ompelemassa.
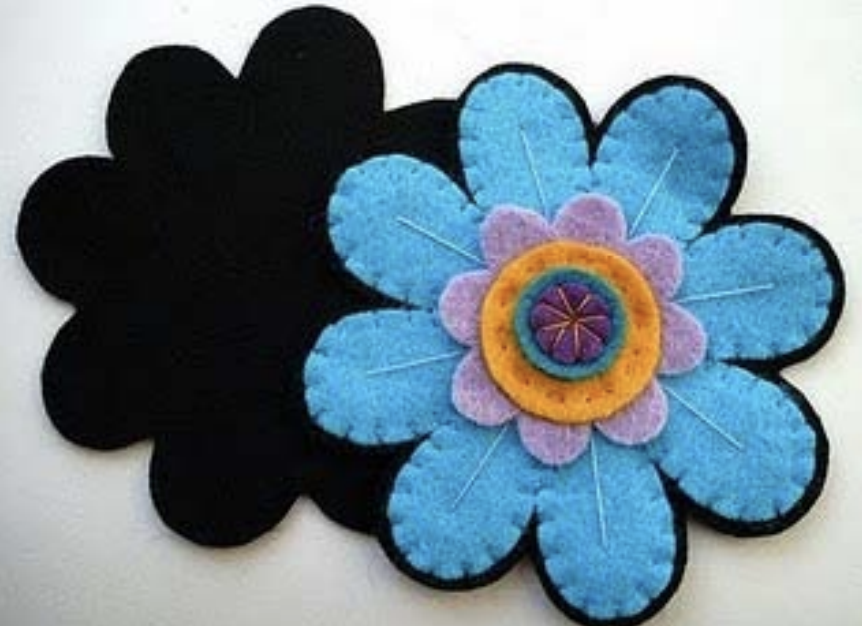
I stitched my flower onto a backing piece of black felt. The wool blend felt I use and sell in my shops is lovely and soft but this softness means an extra layer for added sturdiness is sometimes needed.
Having finished the front of your brooch, you need a matching back piece to sew your clasp to and to hide your stitches. Use your brooch as a template to cut out a piece that exactly matches.
Ompelin oman työni mustalle taustahuovalle. Villasekoitteinen huopakangas on ihanan pehmeää, mutta jos haluaa tukevamman lopputuloksen, pitää työhön lisätä ylimääräinen kangaskerros.
Kun työsi etupuoli on valmis, pitää taustapuolelle ommella vielä samanmuotoinen pala peittämään nurjan puolen ompeleita. tauskankaaseen ommellaan myös hakaneula korun kiinnitystä varten.

Sewing the clasp and finishing the work
Turn the backing piece over (so the side which will be the back of your finished brooch is facing upwards) and use a double thickness of sewing
thread to sew on a brooch clasp.
If you don't have any clasps you can use a safety pin. Use a small piece of felt sewn over the fixed bar of the pin and a crisscross pattern of stitches to sew the safety pin in place - I've used bright felt and thread here to show this clearly.
Finally, sew the front and back pieces of your brooch together (I used a
running stitch in black thread around the blackedge) and finish your stitches neatly at the back.
Then start wearing your brooch and start
planning more fun felt things to make with your stash!
Hakaneulan ompelu ja viimeistely
Ompele kaksinkertaisella ompelulangalla hakaneulan kiinnityspala paikoilleen taustapalan oikealle puolelle. Päätä pitävästi.
Ompele lopuksi taustapala ja päällinen yhteen etupistoin mustalla langalla pitkin korun reunaa.
Ota rintakoru käyttöön ja ryhdy uusia hauskoja
huopakoruja suunnittelemaan!